インストールは簡単5Step!
1. Projectファイルの一覧上部にあるプルダウンメニュー「▼」から「Android」を選択する
(この操作によってgradleファイルが表示される)

gradleファイルとは:パッケージ管理設定ファイル
2. build.gradleファイル(appじゃない方)を開き、以下のコードを追加する
(プロジェクト全体のパッケージ管理設定ファイル)
|
/* build.grade
* MyToDo-Android-
* Created by Terrine on 2021/10/15.
*/
// Top-level build file where you can add configuration options
common to all sub-projects/modules.
buildscript {
    repositories {
        //使用するオンラインデータベースの指定
        google()
        mavenCentral()
        jcenter()
    }
    dependencies {
        classpath "com.android.tools.build:gradle:7.0.2"
        /********
        Realmのクラスパス指定 10.8.0はバージョンを示しているため、
        リアルタイムの更新情報を確認する必要がある
        *********/
        classpath "io.realm:realm-gradle-plugin:10.8.0"
        // NOTE: Do not place your application dependencies here; they belong
        // in the individual module build.gradle files
    }
}
allprojects {
    repositories {
        google()
        mavenCentral()
        //追加するコード
        jcenter()
    }
}
task clean(type: Delete) {
    delete rootProject.buildDir
}
|
3. build.gradleファイル(作成したプロジェクト名.app)を開き、以下のコードを追加する
(アプリケーションの設定ファイル)
|
/* build.grade
* MyToDo-Android-
* Created by Terrine on 2021/10/15.
*/
plugins {
    id 'com.android.application'
    //プラグインの指定
    id 'realm-android'
}

android {
    compileSdk 31

    defaultConfig {
        applicationId "com.example.mytodo_1014_test"
        minSdk 23
        targetSdk 31
        versionCode 1
        versionName "1.0"

        testInstrumentationRunner "androidx.test.runner.AndroidJUnitRunner"
    }

    buildTypes {
        release {
            minifyEnabled false
            proguardFiles getDefaultProguardFile('proguard-android-optimize.txt'),
'proguard-rules.pro'
        }
    }
    compileOptions {
        sourceCompatibility JavaVersion.VERSION_1_8
        targetCompatibility JavaVersion.VERSION_1_8
    }
    buildFeatures {
        viewBinding true
    }
}

//プラグインの読み込み
realm {
    syncEnabled true
}

dependencies {
    implementation fileTree(dir: 'libs', include: ['*.jar'])
    implementation 'androidx.appcompat:appcompat:1.3.1'
    implementation 'com.google.android.material:material:1.4.0'
    implementation 'androidx.constraintlayout:constraintlayout:2.1.1'
    implementation 'androidx.navigation:navigation-fragment:2.3.5'
    implementation 'androidx.navigation:navigation-ui:2.3.5'
    testImplementation 'junit:junit:4.13.2'
    androidTestImplementation 'androidx.test.ext:junit:1.1.3'
    androidTestImplementation 'androidx.test.espresso:espresso-core:3.4.0'
    // RealmAdapterの追加
    implementation 'io.realm:android-adapters:4.0.0'
}
|
4. settings.gradleファイルを開き、以下のコードをコメントアウトする
※重要!このコードをコメントアウトしなければWorningが発生して、インストールできないので注意!!
|
/* settings.gradle
* MyToDo-Android-
* Created by Terrine on 2021/10/15.
*/
/* ここから
    dependencyResolutionManagement {
    // ビルドでリポジトリを設定する方法を構成する
    repositoriesMode.set(RepositoriesMode.FAIL_ON_PROJECT_REPOS)
    repositories {
     /*
    * プロジェクトで直接宣言されたリポジトリはビルドエラーを引き起こす
    * この定義はプロジェクト作成時に自動生成される
    */
        google()
        mavenCentral()
        jcenter() // Warning: this repository is going to shut down soon
    }
}
   ここまで*/
rootProject.name = "MyTodo-10.14-Test"
include ':app'
|
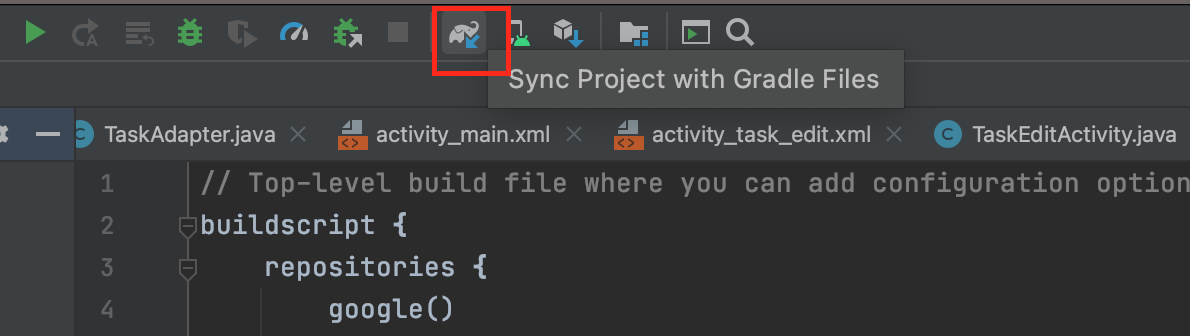
5. Sync Project with Gradle Filesを実行する
(指定したプラグインをプロジェクトに同期する処理)
#共に戦うプログラマへ
筆者はRealmのインストールを完全に終えるまでに3日程かかりました(T▽T;)
コメント入力した部分の他にも細かなバージョン定義等ありますが、定義方法はバージョンによって異なるので省かせて頂いています。
Android Studioはバージョン更新に伴って大きく仕様が異なるので、参考にできる記事も少ないですが、地道に頑張りましょう!
*******記事の更新記録*******
2021/10/15....初回記録!<更新!
;*********************